
Vintyl user guide
Vintyl drives drag-knife vinyl cutters from Linux: it places your designs on a picture of the material, lets you draw and edit them, and sends the job to the cutter. This guide is for version 0.9.1.
Nothing is sent to the cutter until you confirm it in the check list. Before the first cut of a new material, cut the knife test.
- 1. Installation and the first start
- 2. The window
- 3. The cutter
- 4. Materials
- 5. Drawing and editing
- 6. Opening and saving files
- 7. Laying out the design
- 8. Cutting
- 9. Drawing with a pen
- 10. Colours
- 11. Settings
- 12. Keyboard shortcuts
- 13. When something goes wrong
1. Installation and the first start
- Download the AppImage from Releases. It is one file with everything inside and runs on most 64-bit Linux systems.
-
Make it executable and start it:
chmod +x Vintyl-*-x86_64.AppImage
./Vintyl-*-x86_64.AppImage
Vintyl asks once whether to add itself to the applications menu (also Help → Add Vintyl to the applications menu).
-
Let your user send to the cutter. On Linux a cutter is a device file and only the members of its group may use it. Join the group once, then log out and in again:
sudo usermod -aG lp $USER        # a cutter connected as a USB printer
sudo usermod -aG dialout $USER   # a serial port (Arch, Manjaro: uucp)
Help → Access to the cutter shows this with a button to copy the commands, and says whether you may use the chosen port now.
- Plug the cutter in, switch it on, and choose it under Cutter in the left panel. A green dot means it is ready; a yellow frame says what is missing and links to the help.
- Choose the Material (vinyl film to begin with).
2. The window
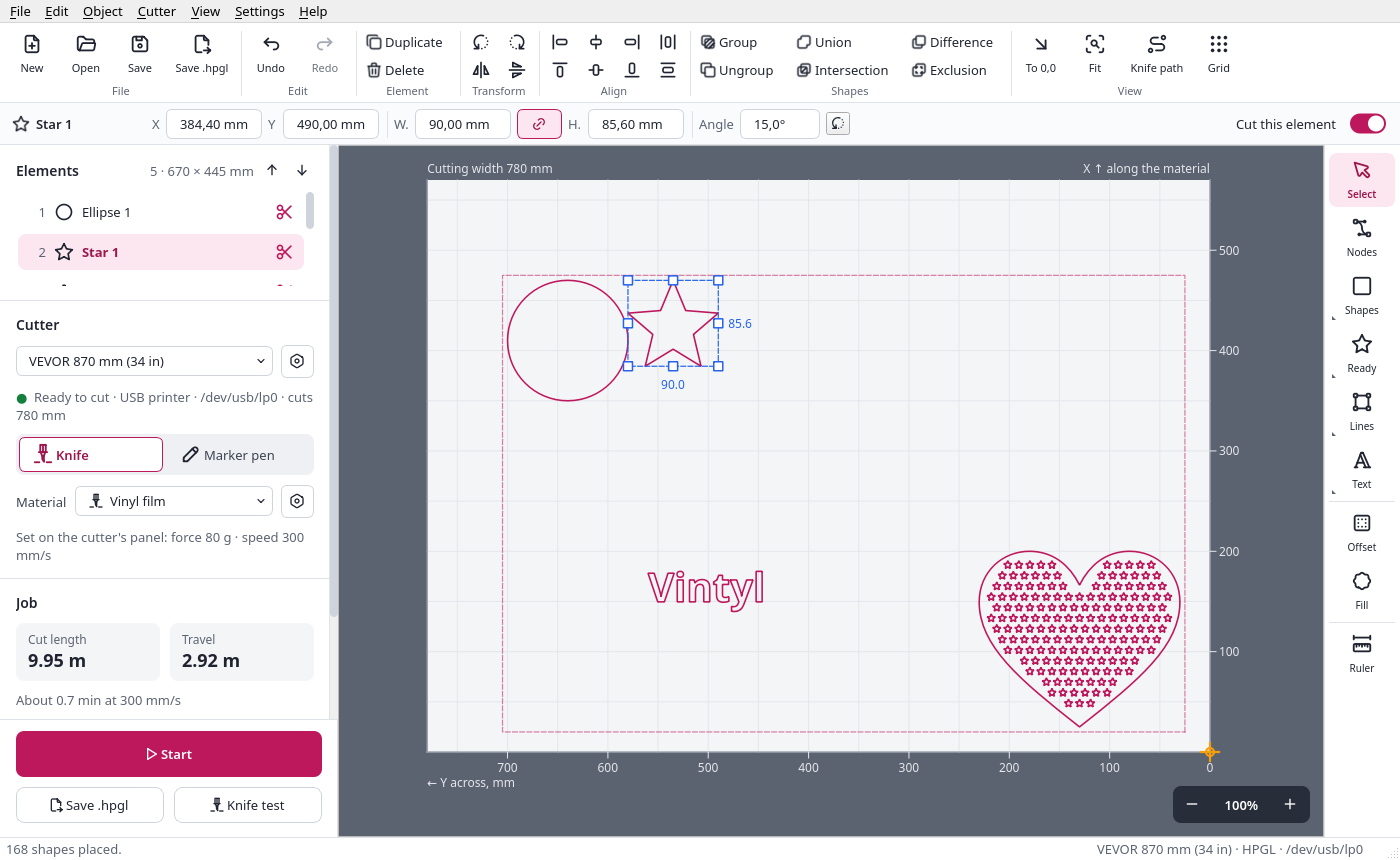
- The ribbon at the top: File, Edit, Element, Transform, Align, Shapes and View. Buttons that need a selection are grey without one; every button has a tooltip.
- The selection bar under it: the type and name of what is selected, its place (X along the material, Y across) and size (with a lock that keeps the proportions), the angle to turn it by, the fields of its kind (a rectangle’s corner radius, a polygon’s sides, a text’s font) and Cut this element. With nothing selected it shows a hint; with the ruler, the length measured.
- The left panel:
- Elements: the list in the order they are cut, each with its number, type and scissors (click them to leave an element uncut). The arrows move the selected one earlier or later. The right button opens the same menu as on the sheet.
- Cutter: the cutter, its state, the tool (knife or marker pen) and the material, with the force and speed to set.
- Job: the length cut and the travel, and the job’s switches.
- At the bottom, always in sight: Start, Save .hpgl and Knife test.
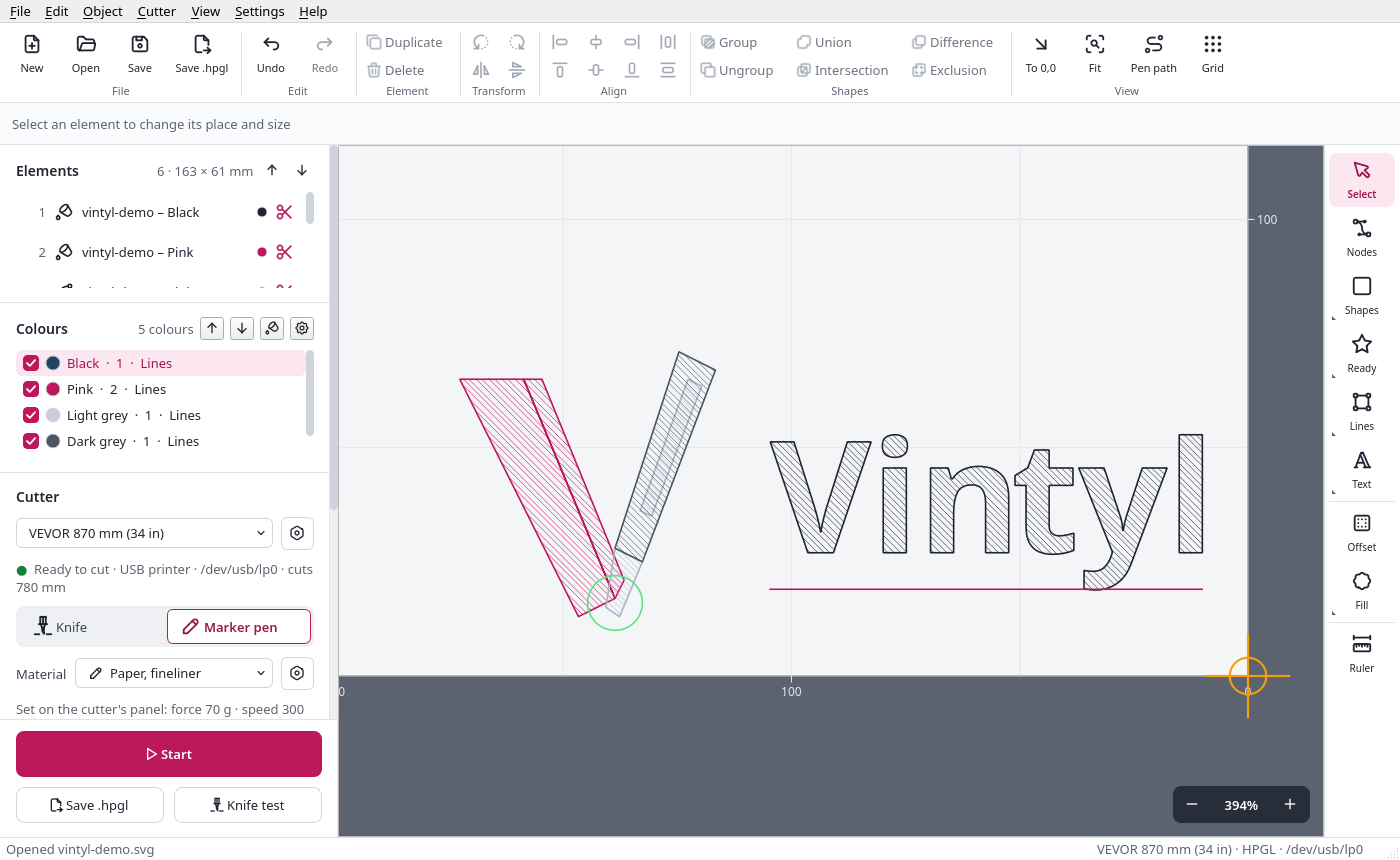
- The sheet: the material as it lies in the cutter, seen from above. The origin (0, 0) is the orange cross at the bottom right, where the cutter starts (its Origin key); X runs up along the material, Y to the left across it. Rulers in mm, the cutting width at the top, zoom buttons at the bottom right; the mouse wheel zooms, the middle button moves the view. Zooming out stops at the whole sheet (100%), where it sits as Fit puts it; zooming in has no such limit.
-
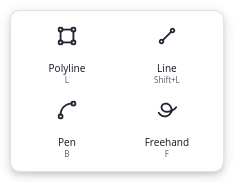
The tool strip on the right. A small triangle in a button’s corner means it opens a set of tools.
3. The cutter
Choose the cutter in the left panel. The cutter settings (the button beside it, or Cutter → Cutter settings) hold, for each cutter:
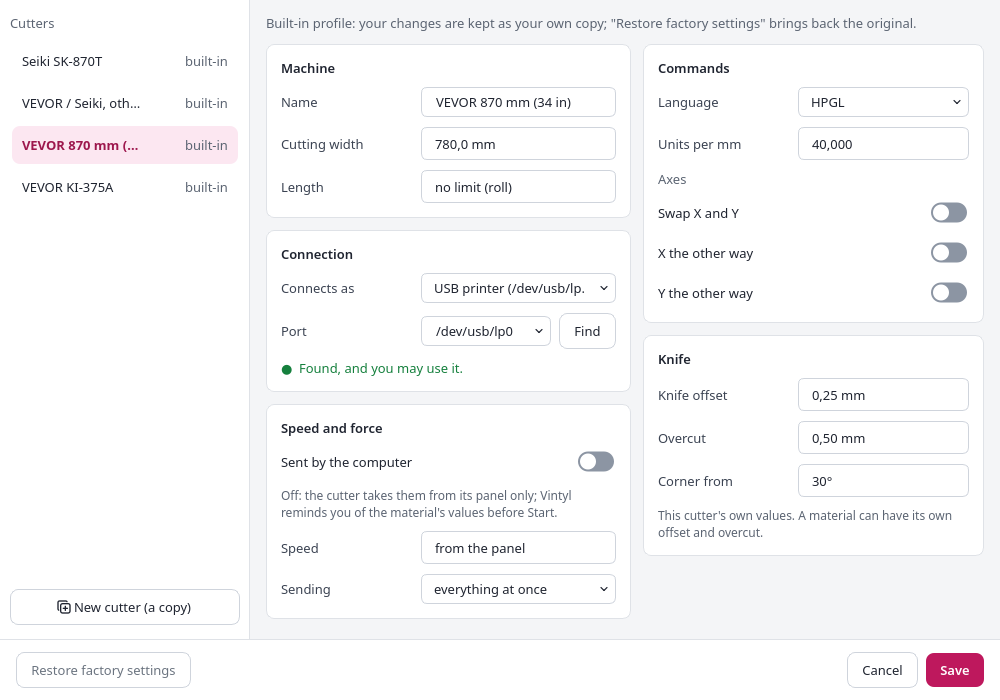
- Machine: name, cutting width, length (0: a roll).
- Connection: a USB printer (
/dev/usb/lp…) or a serial port, the port (Find lists the devices found and says whether you may use them), and for a serial port its speed and flow control. - Speed and force: whether they are sent by the computer. The VEVOR and Seiki cutters take them from their panel only, so this is off.
- Commands: HPGL or DMPL, units per mm, and the axes (swap, reverse) if a cutter cuts turned or mirrored.
- Knife: the knife offset (how far the blade’s tip trails behind the holder’s axis) and the overcut. These are worked into the knife’s path by Vintyl; nothing is set on the cutter for them.
Built-in cutters can be changed: your changes are kept as your own copy, and Restore factory settings brings back the original. New cutter (a copy) starts a profile of your own from the one shown.
Blades and their knife offset
The blade’s angle says how thick a material it cuts; its offset (how far the tip trails behind the holder’s axis) is what Vintyl needs to turn corners sharply. The offset is set by the blade’s maker: when the pack prints it, use that. Otherwise:
| Blade | Knife offset | For |
|---|---|---|
| 45° (standard) | 0.25 mm | ordinary vinyl, heat transfer vinyl (flex), “all purpose” |
| 60° | 0.50 mm | thick materials: reflective vinyl, sandblast, flock, magnetic, card, vinyl over 3 mil (0.08 mm) |
| 60°, for very thick | 1.00 mm | very thick: card, magnetic, sandblast |
| 30° (fine, thin films) | about 0.25 mm | thin films and fine detail |
The 45° and 60° rows are Roland’s (Cutter Blade Reference Guide, 2017: blades ZEC-U5032, ZEC-U1005, USA-C145-X at 45°/0.25; ZEC-U3050 at 60°/0.50; ZEC-U3100 at 60°/1.00). The 30° row comes from blade sellers and is only a starting point. Blades of other makers come in the same angles, but their offsets can differ: cut the knife test.
Where to set it: the cutter’s own value is in the cutter settings (Knife offset, 0.25 mm for the 45° blade it comes with). A material that needs another blade can have its own: in the materials window, Blade and Knife offset (empty: the cutter’s value). The built-in reflective vinyl has the 60° blade with its 0.50 mm offset; if your 60° blade has another offset, change it there.
Reading the corners (Roland): rounded corners mean too little offset; small flaps sticking out at the corners mean too much.
| Cutter | Status |
|---|---|
| VEVOR KI-375A | tested: cuts cleanly |
| Seiki SK-870T | tested: cuts cleanly |
| VEVOR 870 mm | profile ready, the same board |
| VEVOR / Seiki, other model | set its cutting width; should work the same |
These cutters have been used in their USB printer mode. Their second mode, Virtual COM (a serial port), is prepared in the profiles but has not been tried on a cutter yet.
4. Materials
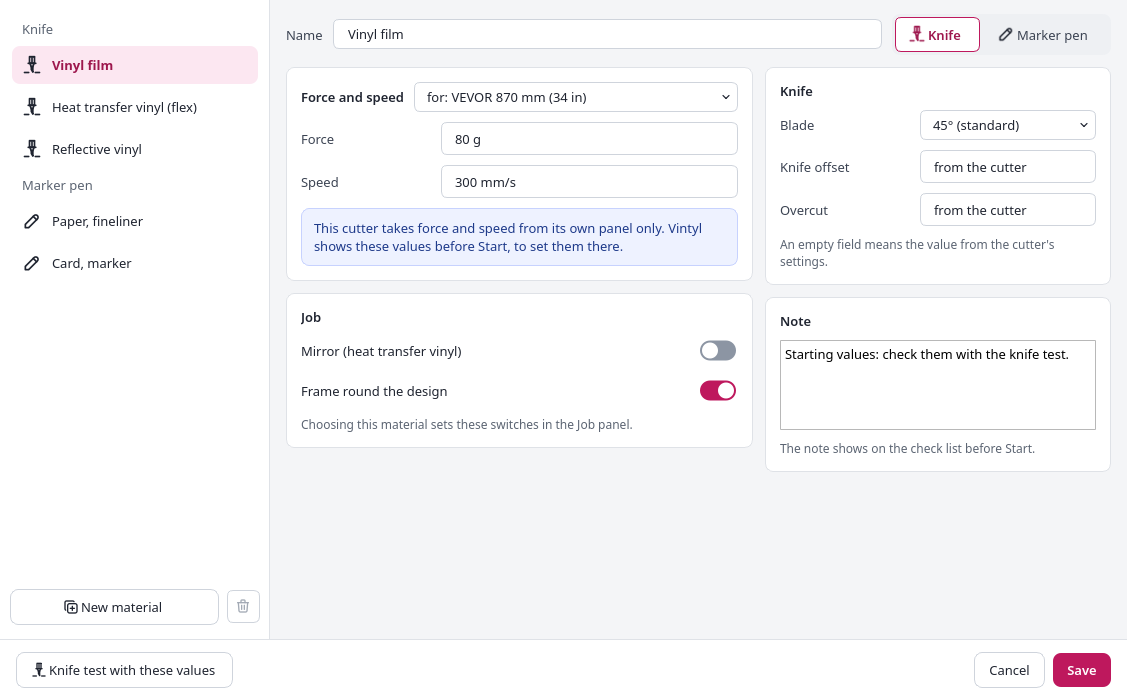
A material holds how to cut (or draw on) it: the tool, the force and speed for each cutter, the blade, the knife offset and overcut (empty: the cutter’s own), the mirror, the weeding frame and a note shown before Start. Choosing a material sets the tool and the job’s switches.
Built in, as starting values for the VEVOR and Seiki cutters, all at 300 mm/s:
| Material | Small KI-375A | 870 mm cutters |
|---|---|---|
| Vinyl film | 50 g | 80 g |
| Heat transfer vinyl (flex), mirrored | 60 g | 120 g |
| Reflective vinyl, 60° blade | 40 g | 80 g |
| Paper, fineliner (pen) | 35 g | 70 g |
| Card, marker (pen) | 35 g | 70 g |
Cutters differ even with the same board: check the values with the knife test and write your own in the material. Open the materials window with the button beside Material; for: chooses the cutter whose values you see. Knife test with these values cuts the test at once.
5. Drawing and editing
Choose a tool on the right (or press its key), then drag on the sheet:
- Shapes: rectangle (R, with a corner radius in the selection bar), ellipse (E), polygon (P, the number of sides in the bar).
- Ready: star, heart, ring, rounded rectangle, arrow, cross, drop, gear, and a QR code. Each opens a small window with its picture and sizes; Keep the proportions changes the other sizes with one.
- Lines: polyline (L: click the corners; the first one closes it), line (Shift+L), pen (B: click for a corner, drag for a curve), freehand (F).
- Text (T): click where it starts and type in the selection bar; any installed font, bold, italic, letter spacing. Text on a path puts a selected text along another selected shape.
- Nodes (N, or a double click on a shape): drag the nodes and the handles; a double click on a side adds a node; D deletes, L makes a line, C a curve, O smooth, Z closes or opens, B breaks.
- Offset (O): an outline a distance outside or inside; Remove the holes inside gives a solid backing for a text in another colour.
- Union, difference, intersection, exclusion (ribbon, Shapes).
-
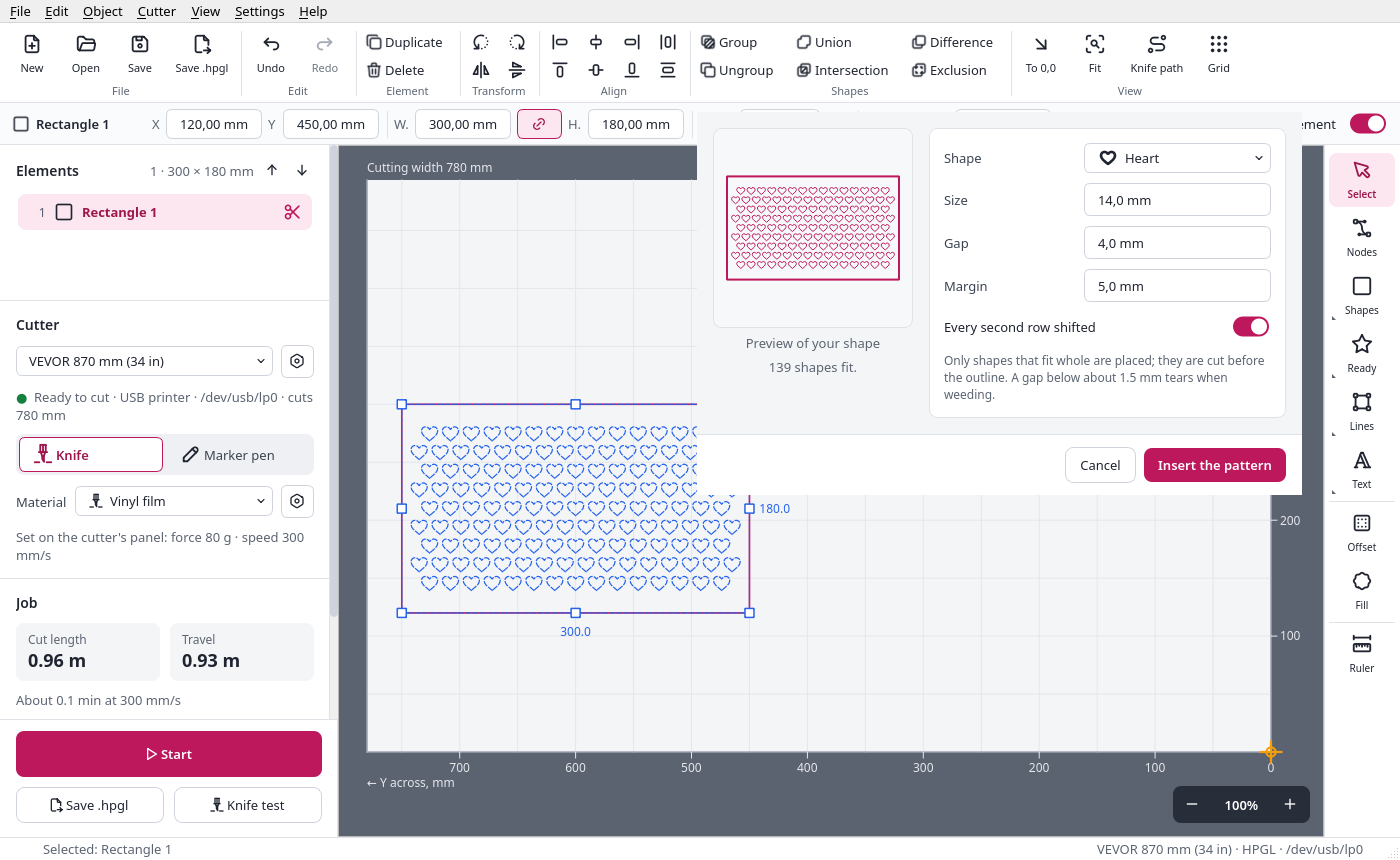
Pattern of shapes (Shift+T): rows of small shapes inside the selected closed shape, each one whole, cut before the outline, with a preview in the window and on the sheet.
- Ruler (M): drag between two points; the length shows in the selection bar.
Snapping to corners, centres and edges of other shapes is on; hold Alt to place freely. The grid (Ctrl+’) and its step are in the settings.
6. Opening and saving files
- Open (Ctrl+O): Vintyl projects (.vintyl), SVG and DXF. A DXF without units asks whether it is in millimetres, centimetres or inches. An SVG of several colours opens in its colours (see 10).
- Save (Ctrl+S) keeps the project: the design, the cutter and the material, the job’s switches.
- Save .hpgl (Ctrl+E) writes the cutter’s file, to cut it some other
way. A design of several colours gets one file for each colour
(
logo-1-Black.hpgl,logo-2-Pink.hpgl…).
7. Laying out the design
- Drag a shape to move it; drag the small squares to resize it (the lock in the selection bar keeps the proportions); the arrow keys nudge it. Type exact numbers in the selection bar.
- Rotate by 90° (Ctrl+[ and Ctrl+]) or by any angle (the field and button in the selection bar); mirror (Ctrl+M) and flip (Ctrl+Shift+M).
- Align and distribute two or more shapes (ribbon, Align).
- Group (Ctrl+G) shapes to move them together.
-
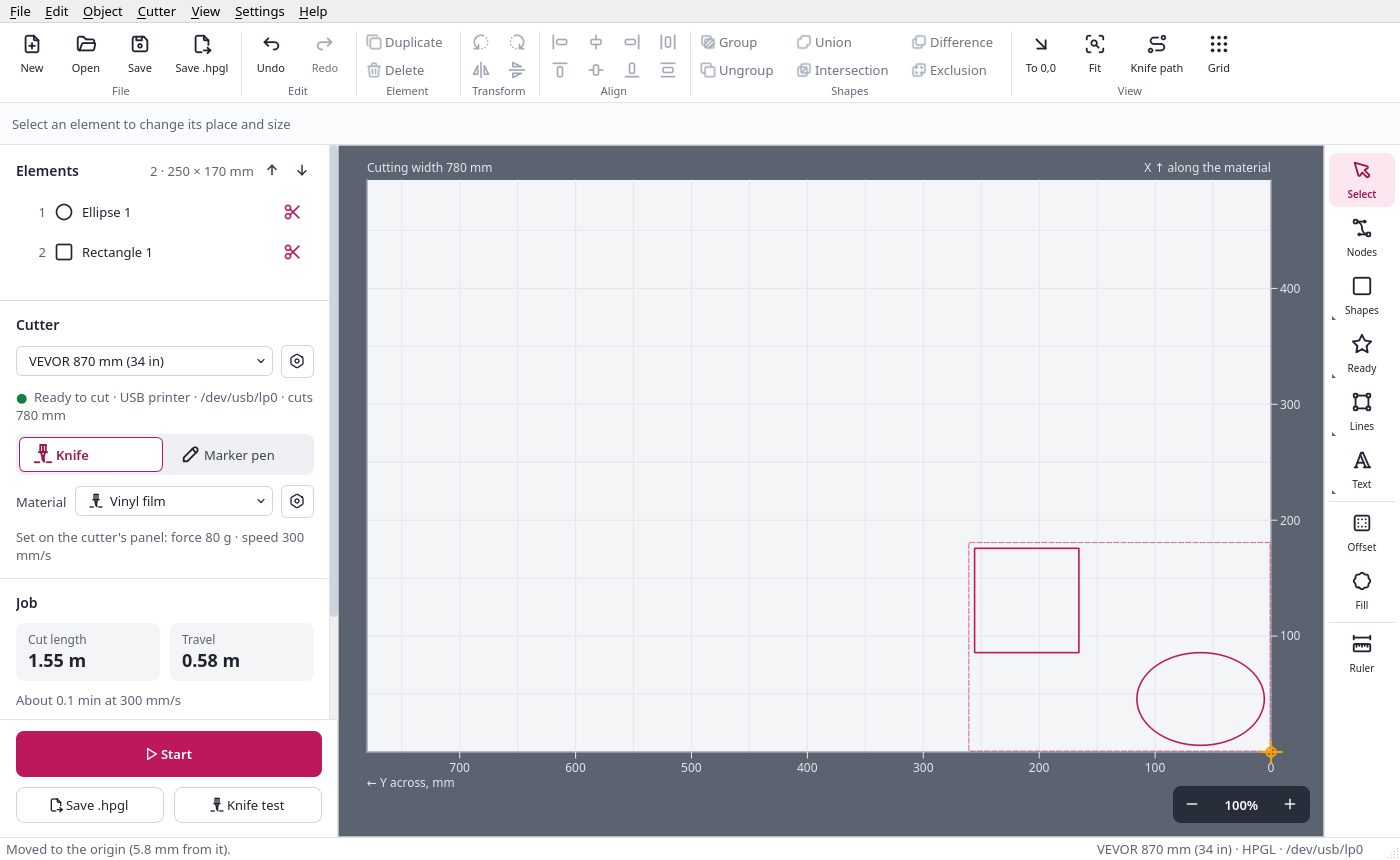
To 0,0 (Ctrl+Home, ribbon View): the selected elements, or the whole design when nothing is selected, move together up to the origin, so no vinyl is wasted before them. Room is left for the weeding frame and the knife.
- Copies (Object → Copies): rows along and columns across, a gap apart, or as many columns as fit in the width.
- The cutting order is the element list: the arrows beside it, or the right button → Cutting order. Inside shapes are cut first anyway.
-
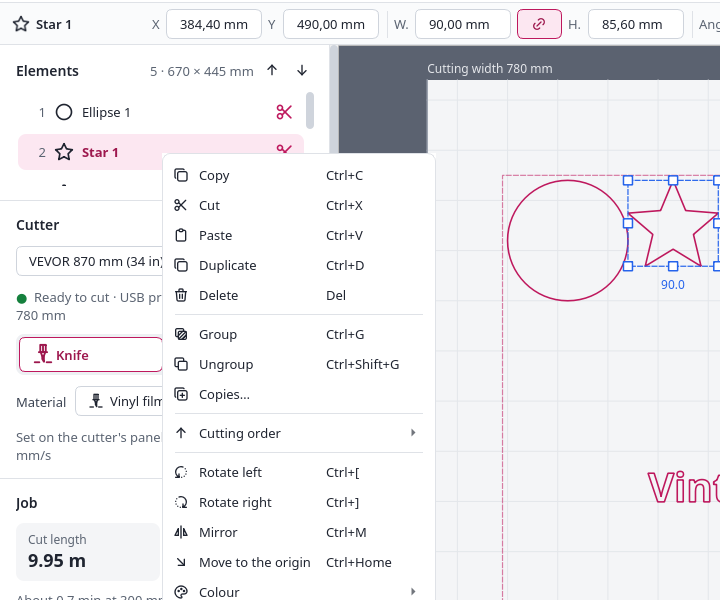
The right button on a shape or on the list opens its menu (copy, cut, paste, duplicate, delete, group, the cutting order, turn, mirror, To 0,0, edit nodes, cut or not).
- Undo (Ctrl+Z) and redo (Ctrl+Shift+Z) everything.
8. Cutting
- Put the material under the pinch rollers and set the origin with the cutter’s Origin key where the design should start.
- Set the force and speed on the cutter’s panel (the material shows them under Material).
- Check the job’s switches in the left panel:
- Inside shapes first (on): holes before their outline.
- Mirror for heat transfer vinyl: the job is cut mirrored, the screen shows it as on the shirt.
- Frame round the design, with its margin: a frame cut last, for weeding.
-
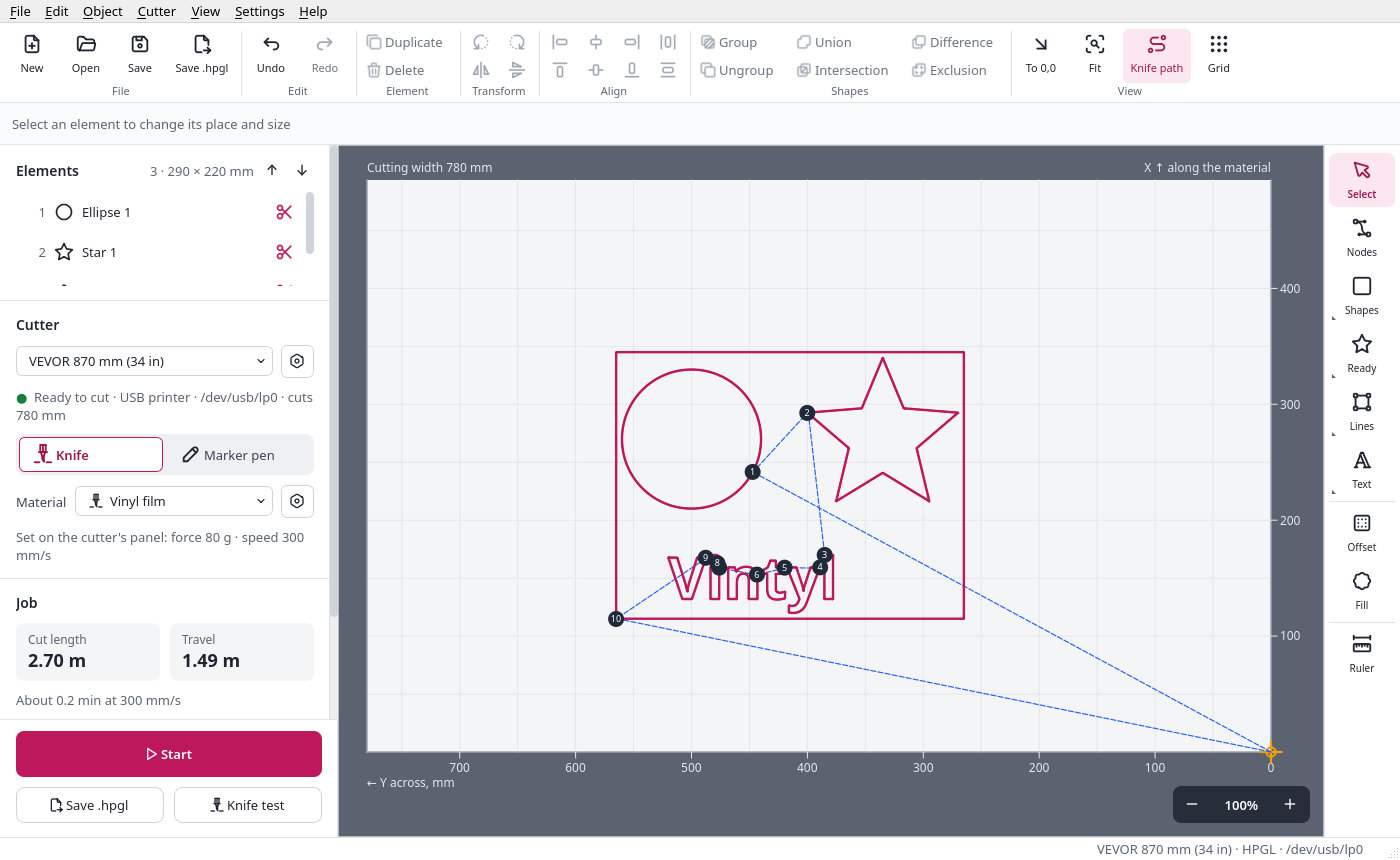
Knife path (Ctrl+K) shows exactly what the knife does: the cuts in their order and the travels.
-
Press Start. The check list shows the cutter, the tool, the material, the force and speed to set on the panel in large type, the blade, and what Vintyl works into the knife’s path. Check the points and press Cut.
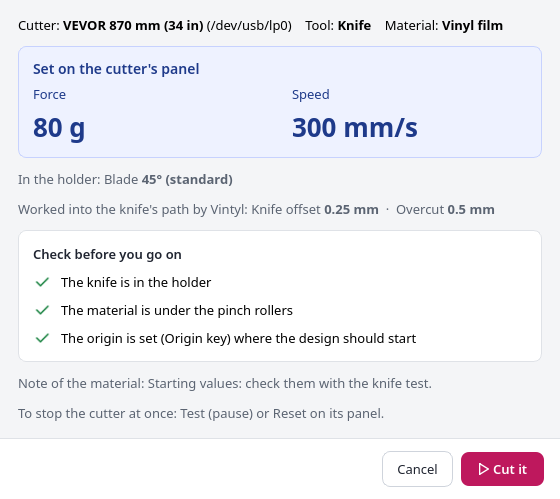
- While it sends, Stop takes Start’s place and shows how much is sent. To stop the cutter at once, press Test (pause) or Reset on its panel.
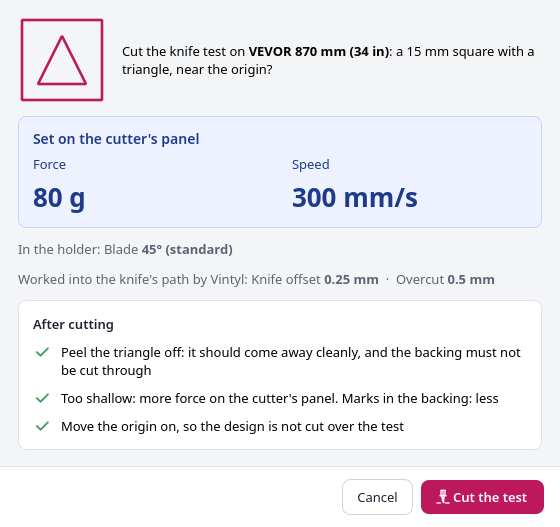
Knife test. On a new material press Knife test: it cuts a 15 mm square with a triangle near the origin. Peel the triangle off: it should come away cleanly and the backing must not be cut through. Too shallow: more force; marks in the backing: less. Move the origin on before the design.
More for weeding and big designs (Object menu):
- Weeding lines: cuts through the waste between the shapes (across, up and down, or both), every so many mm, up to the frame.
- Split into strips: a design wider than the cutter (or longer than a sheet) in strips that overlap, laid one after another on the material.
9. Drawing with a pen
Put a pen in the holder (its tip just above the paper) and switch the tool in the left panel to Marker pen. There is no knife offset and no overcut; set the pen width and where the stroke lies: on the line, outside or inside it. Use a low force.
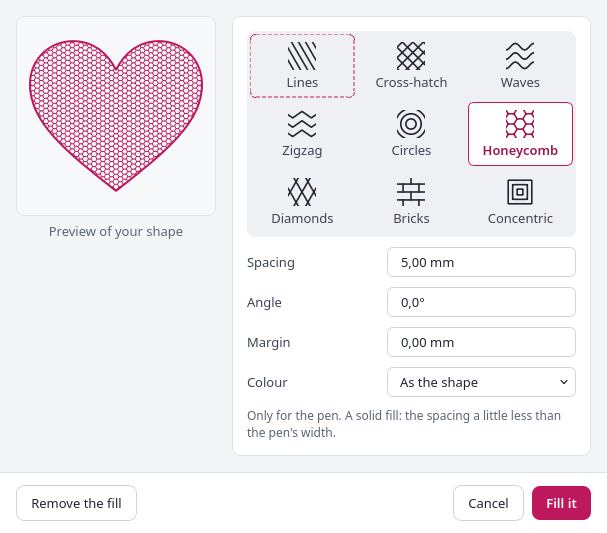
Fill (Shift+F, pen only) fills closed shapes with a pattern: lines, cross-hatch, waves, zigzag, circles, honeycomb, diamonds, bricks or concentric, with its spacing, angle and margin. For a solid fill, set the spacing a little less than the pen’s width. Its Colour says which pen draws the fill: As the shape, another colour of the design, or New colour…, for a black outline with a pink fill (see 10. Colours).
10. Colours
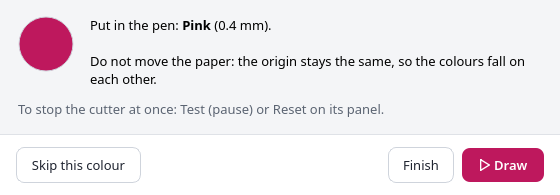
A design can have several colours: with the pen, each colour is drawn with its own pen; with the knife, each colour is cut from its own vinyl. The cutter has one holder, so Vintyl does one colour, stops, and asks for the next pen (or the next vinyl).
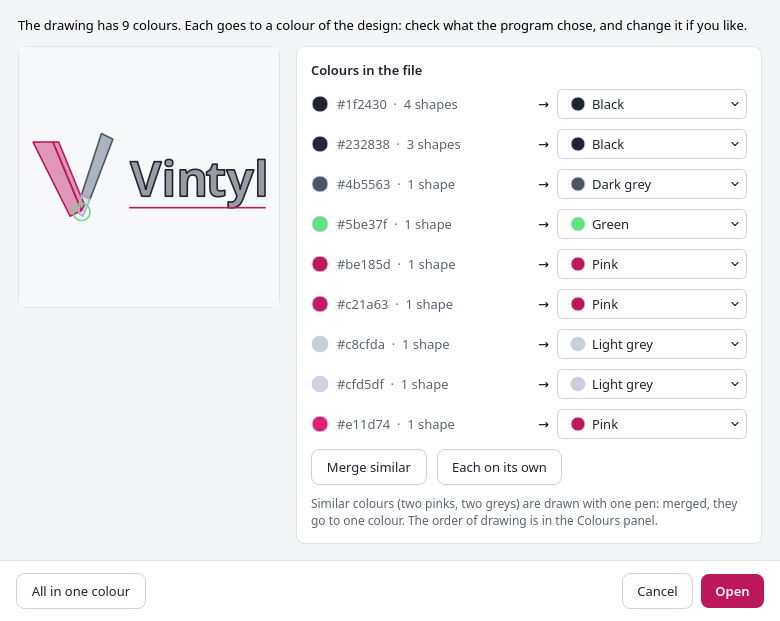
Opening an SVG of several colours. A window shows each colour of the file and the colour of the design it goes to. Similar colours (two pinks, two greys that the eye hardly tells apart) are merged into one, so one pen draws them; Each on its own keeps every colour apart, and All in one colour opens the drawing as before, in one colour. Change any row before you press Open. Shapes filled in the file get a line fill for the pen; a shape with a stroke of another colour than its fill (a pink shape with a black edge) opens as a black outline with a pink fill, drawn with two pens, the fill’s colour first. To try it, open the demo: vintyl-demo.svg.

The Colours panel (in the left panel, when the design has more than one colour) lists the colours in the order they are drawn: the arrows move the chosen colour earlier or later (light colours first and the black outline last is usual). The tick leaves a colour out of the job. A click on a colour selects its elements; the gear sets its name, its colour and its own pen width and where its stroke lies (empty: as in the window). The bucket (with the pen) fills every closed shape of the chosen colour with a pattern, in the same window as Fill, also the shapes that were only an outline in the file; the list shows the pattern beside the colour. On the sheet and in the element list every element shows in its colour.
To give elements another colour, use the right mouse button → Colour: choose one of the design’s colours, or New colour….
An outline and a fill in two colours. In the Fill window (or with the bucket) choose the fill’s Colour: the outline stays with its pen, the fill goes with the other, as its own colour in the panel. A new colour for a fill is put before the outline’s, so the outline is drawn last and gives the shape a clean edge. Two pens seldom sit exactly alike in the holder: if the fill shows past the outline, give the fill a Margin of about 0.2–0.3 mm.
The right mouse button on a colour in the panel: its settings, its fill, and Remove this colour: its elements go to the first other colour, the fills it drew to their shapes’ own colour (Ctrl+Z brings it back).
Start, colour after colour. The check list names the colours in their order. Before each colour a window asks you to put in its pen (or its vinyl) and to leave the material where it is: the origin stays the same, so the colours land exactly on each other. Skip this colour goes on with the next one; Finish stops there.
11. Settings
Settings (Ctrl+,):
- Drawing: the grid’s step, snapping to other shapes, and what the colours window proposes first for an SVG of several colours: Merge similar or Each on its own.
- Language and look: English, Polish, German, Spanish, French or Brazilian Portuguese (or the system’s), light, dark or the system’s look; they change at the next start.
- Updates: check once a day for a new version (only GitHub is asked, nothing about you is sent), or Check now. A new version shows in a bar under the ribbon.
12. Keyboard shortcuts
Help → Keyboard shortcuts (Ctrl+F1) lists every key, with a search.
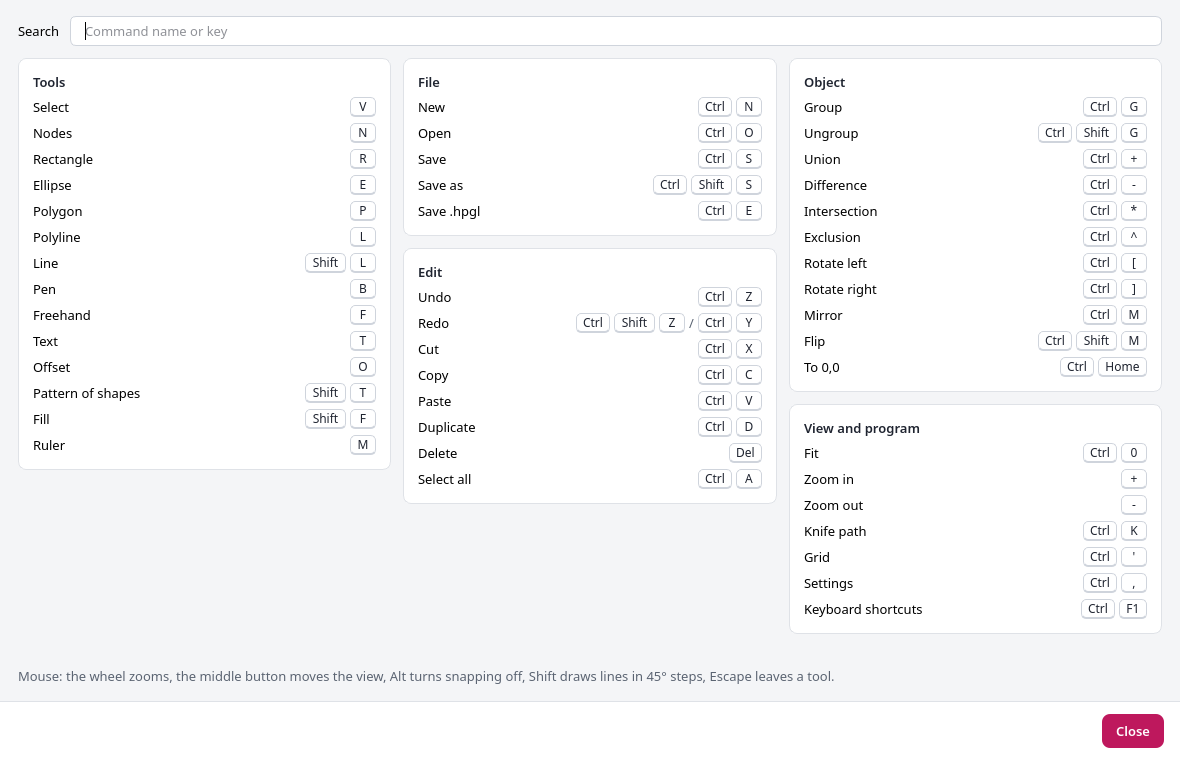
| Key | Command | Key | Command |
|---|---|---|---|
| V | Select | Ctrl+N / O / S | New / Open / Save |
| N | Nodes | Ctrl+E | Save .hpgl |
| R / E / P | Rectangle / Ellipse / Polygon | Ctrl+Z / Ctrl+Shift+Z | Undo / Redo |
| L / Shift+L | Polyline / Line | Ctrl+C / X / V | Copy / Cut / Paste |
| B / F | Pen / Freehand | Ctrl+D / Del | Duplicate / Delete |
| T | Text | Ctrl+A | Select all |
| O | Offset | Ctrl+G / Ctrl+Shift+G | Group / Ungroup |
| Shift+T | Pattern of shapes | Ctrl+[ / Ctrl+] | Rotate left / right |
| Shift+F | Fill (pen) | Ctrl+M / Ctrl+Shift+M | Mirror / Flip |
| M | Ruler | Ctrl+Home | To 0,0 |
| Ctrl+0 | Fit | Ctrl+K | Knife path |
| + / - | Zoom in / out | Ctrl+’ | Grid |
13. When something goes wrong
- “No permission to use…” or “…is not there now” under the cutter: join the group (see 1) and log in again; check the cable, that the cutter is on, and its port in the cutter settings (Find).
- It cuts too deep or not through: change the force on the cutter’s panel, cut the knife test, and write the value in the material.
- Corners are rounded: the knife offset is too small; small flaps stick out at the corners: it is too large. Set it for your blade (see Blades and their knife offset: 0.25 mm for a 45° blade, 0.50 mm for most 60° ones) and cut the knife test again.
- “The design does not fit on the material”: it sticks out before the origin or past the cutting width; use To 0,0, or move it in.
- A bug, or your cutter works (or not): Help → Diagnostic report shows the versions, the checks and the log (no user name, no designs); Report a problem or Report my cutter opens GitHub’s form with it copied. Small glitches in the interface may still turn up in this version: thank you for reporting them.