
Kerfly user guide
Kerfly controls K40-class CO2 lasers with Lihuiyu (M2 Nano family) boards: it places your designs on the laser bed, lets you draw and edit them, and sends the job to the laser. This guide is for version 1.1.
Always keep a hand near the laser’s power switch, and never leave a running laser unattended.
- 1. First start
- 2. The window
- 3. Moving the laser head
- 4. Opening files
- 5. Drawing and editing
- 6. Layers and materials
- 7. Running a job
- 8. Settings
- 9. Keyboard shortcuts
- 10. When something goes wrong
1. First start
- Install Kerfly as described in the
installation guide,
from the releases page:
- Windows 10 / 11: run
Kerfly-<version>-windows-setup.exe. The installer is not signed, so Windows may say “Windows protected your PC”: choose More info → Run anyway. The first time, tick the USB driver for the K40 laser. - Linux: make
Kerfly-<version>-x86_64.AppImageexecutable and run it. Allow the laser’s USB port once: Laser → Allow USB access for the laser… (asks for your password), then plug the laser in again. - macOS (preview): open the
.dmgand drag Kerfly to Applications; the first start goes through System Settings → Privacy & Security → Open Anyway (the installation guide shows it). USB needs no driver.
- Windows 10 / 11: run
- Check the installation with the self-test (in a command window /
terminal):
- Windows installer:
"C:\Program Files\Kerfly\kerfly-console.exe" --self-test - AppImage:
./Kerfly-<version>-x86_64.AppImage --self-test - macOS:
/Applications/Kerfly.app/Contents/MacOS/Kerfly --self-test
Every line should say
OK;WARNlines are optional parts or mean that the laser is not connected. - Windows installer:
- Open Settings → Settings… → Machine and choose your Controller board (printed on the board, for example LASER-M2 or LASER-M3), the units and the bed size.
- Switch the laser on, connect the USB cable and press the plug button (Connect, Ctrl+I) on the Laser tab. By default Kerfly then homes the head (moves it to the upper left corner).
Kerfly keeps its settings in k40_whisperer.txt in your home folder.
File → Save settings as default keeps changed settings.
2. The window
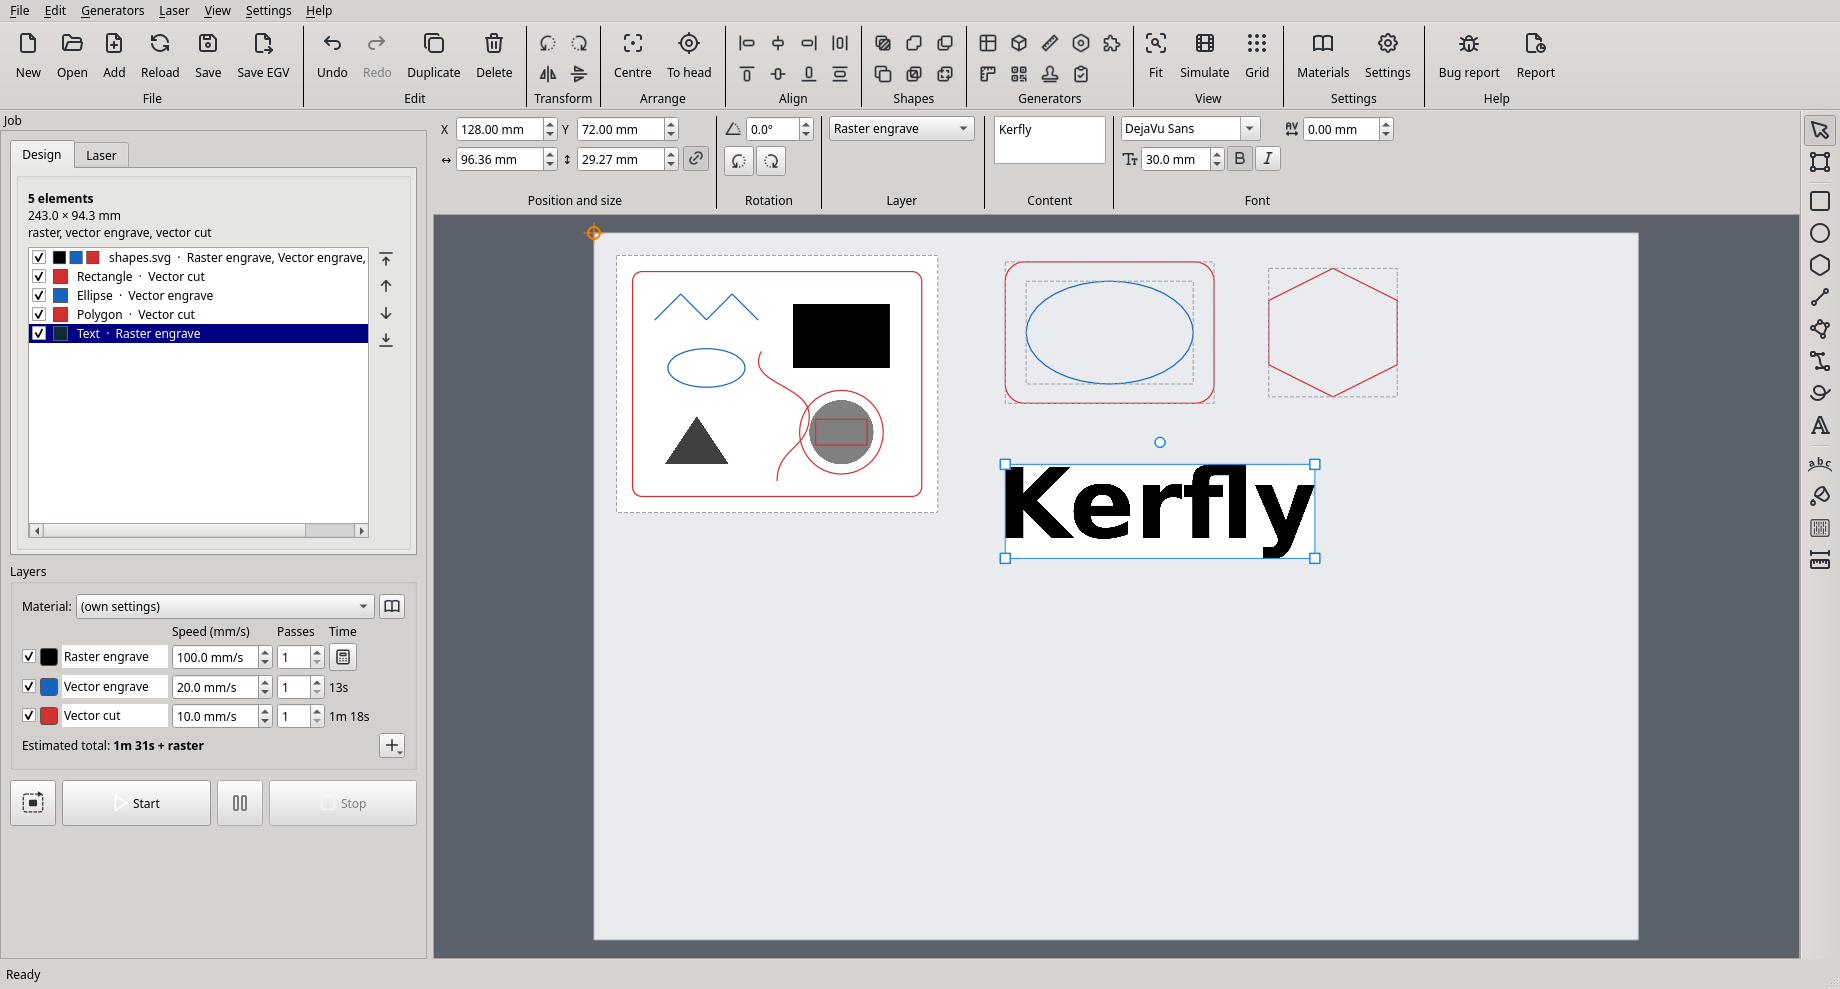
-
Toolbar (top): file, edit, arrange, generators, view, settings and help commands in labelled groups.

-
Options bar (under the toolbar): position, size and rotation of the selected element, its layer, and the options of the selected shape or drawing tool (for example the text and font). When its sections do not fit the window, they scroll sideways.

- Left panel: the Design tab lists the elements on the bed; the Laser tab moves the head. Under the tabs are the Layers and the job buttons (trace, start, pause, stop).
- Bed view (middle): the laser bed with your elements. The orange crosshair is the laser head. Elements that stick out of the bed are drawn red, and the job cannot start until they are moved back.
- Tools (right), in three groups: selecting (select, edit nodes); drawing (rectangle, ellipse, polygon, line, polyline, pen, freehand, text); and operations on shapes (text on a path, fill with a pattern, living hinge, measure).
Mouse in the bed view: the wheel zooms in and out (not further than the whole bed); the middle or right button drags the view; Ctrl+0 fits the bed to the window.
3. Moving the laser head
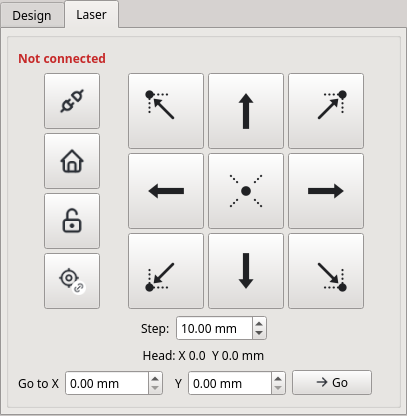
The Laser tab has the machine buttons on the left and the jog pad on the right.
| Button | What it does |
|---|---|
| Plug | Connect to the laser (Ctrl+I) |
| House | Home: move the head to the home corner |
| Open lock | Unlock rail: release the motors so the head can be moved by hand |
| Crosshair with a chain link | Design follows the head (Ctrl+Alt+H), see below |
| Arrows | Move the head by one Step (the field under the pad). Ctrl+arrow keys do the same from the keyboard |
| Dotted corners and centre | Move the head to that corner or the centre of the design, to see where it will be cut. The design does not move. Ctrl+7, Ctrl+9, Ctrl+5, Ctrl+1, Ctrl+3 |
| Go to X / Y, Go | Home, then move the head to that position (distance from the home corner; Ctrl+G) |
The plain arrow keys (without Ctrl) move the selected element on the bed, not the head.
Where the job starts. The design stays where it is on the bed (as in LightBurn or MeerK40t): when a job starts, the head first drives to the design. To start the design where the head is instead:
- Edit → Place design at the head (Ctrl+H, toolbar To head) moves the design to the head once.
- Design follows the head (the button with the chain link, green when on) keeps the design at the head: the arrows, Go to X/Y and Home move the head and the design together, and the arrows do not push the design off the bed. The corner buttons still only move the head.
The K40 does not report where its head is. Kerfly counts the moves it sends; after the motors were unlocked, the head was moved by hand, or a job was stopped, press Home before the next job. After a stopped job Kerfly says so in the status bar.
4. Opening files
File → New project (Ctrl+N, toolbar New) starts with an empty bed and the default layers (it asks to save unsaved changes first). File → Open design… (Ctrl+O) replaces everything on the bed; File → Add design… (Ctrl+Shift+O) puts another file next to the others.
| File | What becomes of it |
|---|---|
| SVG | Red lines are cut, blue lines engraved as outlines, everything else (fills, pictures, black lines) is raster engraved. Inkscape is used when installed, otherwise the built-in renderer; Inkscape is needed for SVG text that is cut or engraved as an outline |
| DXF | Cut lines; blue entities and layers named engrave become outline engraving |
| PNG, JPG, BMP, TIFF, GIF, WebP | Raster engraving: dark pixels are engraved. Kerfly shows the image size; set the resolution or the width and height |
| G-code (.ngc, .gcode, .nc, .g, .tap) | Run as G-code |
| Kerfly project (.kerfly) | The whole layout, layers and drawn shapes |
File → Save project (Ctrl+S) saves the layout, the layers, the drawn
shapes and copies of the opened files in one .kerfly file, so it can be
moved to the computer at the laser. Reload design (F5) reads the opened
files again after you changed them in another program.
5. Drawing and editing

Choose a tool on the right (or press its key), then draw on the bed with the mouse. The options of the tool are in the options bar; you can change them before or after drawing.
| Tool | Key | How |
|---|---|---|
| Select and move | S | Click to select, drag to move; handles scale and rotate. Drag a frame around several elements, or Ctrl+click |
| Edit nodes | N | Drag nodes and the round curve handles (Ctrl: one handle alone). Double-click a side to add a node, a node to remove it. Keys: I insert, D delete, L line, C curve, O smooth, S symmetric, Z close / open, B break |
| Rectangle | R | Drag. Shift: square. Option: corner radius |
| Ellipse | E | Drag. Shift: circle |
| Polygon | P | Drag. Option: number of sides |
| Line | L | Drag. Shift: steps of 45° |
| Polyline | Shift+L | Click the corners. Click the first point to close; double-click or Enter for an open line; Backspace removes the last corner; Esc cancels |
| Pen (curves) | B | Click for a corner, press and drag for a smooth curve. Click the first point to close; double-click or Enter to finish |
| Freehand | F | Draw with the button held; end near the start to close the shape |
| Measure | M | Drag between two points: distance, width, height and angle |
| Text | T | Click, then type in the Content field; choose the font, size, bold and italic |
| Text on a path | Shift+T | Type the text in the options bar, then click a line, curve or shape (see below) |
| Fill with a pattern | Shift+F | Choose a pattern in the options bar, then click closed shapes to fill them (see below) |
| Living hinge | Shift+H | Choose the cuts in the options bar, then click closed shapes to cut a hinge into them (see below) |
Snapping. Drawing and moving snap to the corners, centres and edges of other elements and to the bed (View → Snap to objects, Ctrl+;), and to the grid when it is on (View → Snap to grid, Ctrl+’; View → Grid size). Hold Alt to snap to nothing for a moment. Kerfly remembers the grid (on or off, and its size), snapping to objects and Design follows the head by itself for the next start; they can also be set in Settings → View.
Moving precisely. Type the position, size and angle in the options bar (the chain button keeps the proportions), or use the arrow keys: 1 mm or one grid step, with Shift 10 times as far.
Arranging. The Edit menu and the toolbar have: undo and redo (Ctrl+Z, Ctrl+Shift+Z), duplicate (Ctrl+D), delete (Del), rotate 90° (Ctrl+L, Ctrl+R), mirror (Ctrl+Shift+H, Ctrl+Shift+V), centre on the bed (Ctrl+E), align and distribute, and Combine shapes: union, difference, intersection and exclusion of closed shapes (difference: the other selected shapes are cut out of the one highest in the element list).
Order. The element list is the order of the job: within each layer the laser does the element at the top of the list first. (The layers themselves always run in the order raster engraving, outline engraving, cutting.) Inside one element, inner shapes are still cut before the outer ones, so a part does not fall out before its holes are cut. The arrow buttons beside the element list (Design tab) move the selected elements: Move up (earlier) and Move down (later) one place (PgUp, PgDown while the bed view has the focus), To the start and To the end to the top or the bottom of the list (Ctrl+PgUp, Ctrl+PgDown). Groups move together.
Groups. Group (Ctrl+Shift+G) makes several elements move together; clicking one member selects the whole group, a second click selects that member alone. Ungroup (Ctrl+Alt+G) splits a group, and also an opened SVG or DXF file: each of its lines becomes a shape you can edit, and its pictures split into their separate parts. Double-click any element to edit its nodes.
Pattern fills. The Fill with a pattern tool (the bucket, Shift+F) fills closed shapes with engraved lines in a pattern: lines, cross-hatch, waves, zigzag, circles, honeycomb, diamonds or bricks.
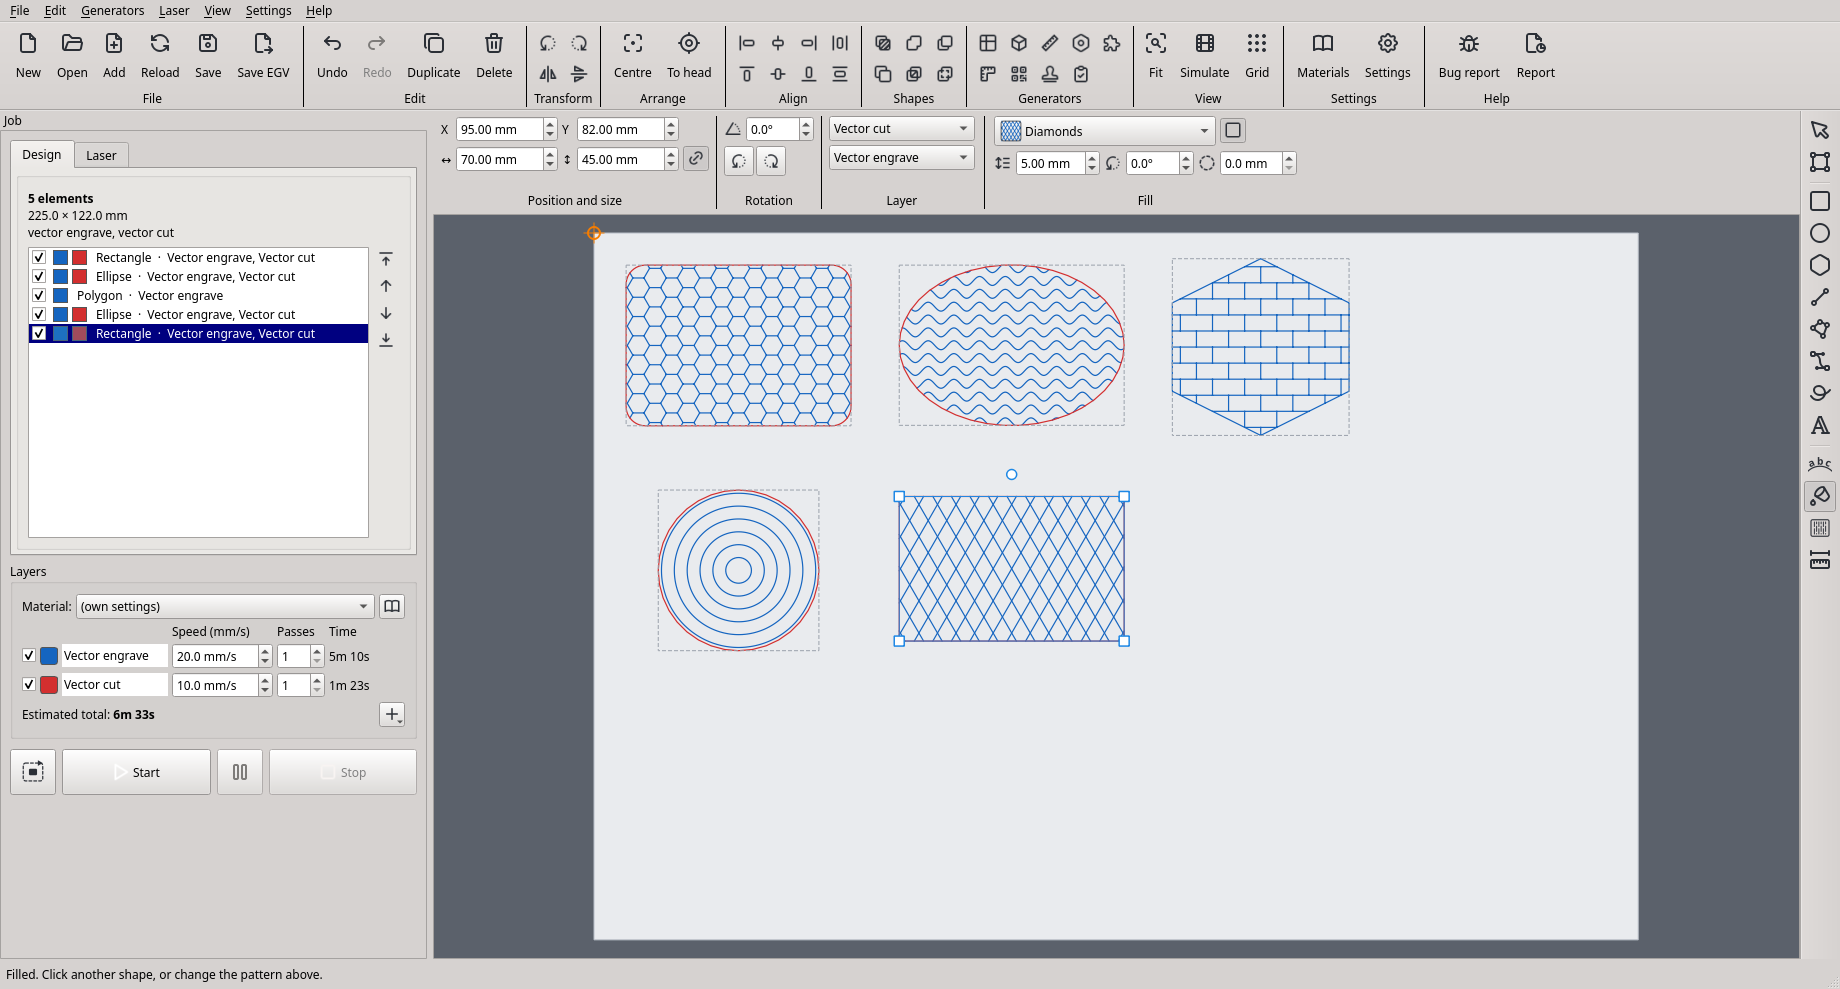
- Choose the tool and a pattern in the Fill section of the options bar. Set its size (the distance between its lines), its angle and a margin kept free inside the outline.
- Click a closed shape on a cut or outline layer. Click more shapes to fill them too; shapes that are selected get the pattern you choose at once. With shapes selected, the options bar shows what they have now (No pattern for shapes without one); the Living hinge tool works the same way.
- The outline stays on its layer: a cut shape is still cut, and the pattern is engraved on an outline layer (for a cut shape a second Layer list chooses which). The square button next to the pattern list leaves the outline out, so only the pattern is engraved: Lines or Cross-hatch without the outline fill an area with engraved lines (this was the separate Hatch section before 0.17; older projects open this way).
A selected shape shows the same Fill section with the select tool: change the pattern there, or choose No pattern to remove it. Holes in the shape (for example in letters) stay empty. An opened SVG or DXF file must be ungrouped first (Edit → Ungroup), so that its lines become shapes.
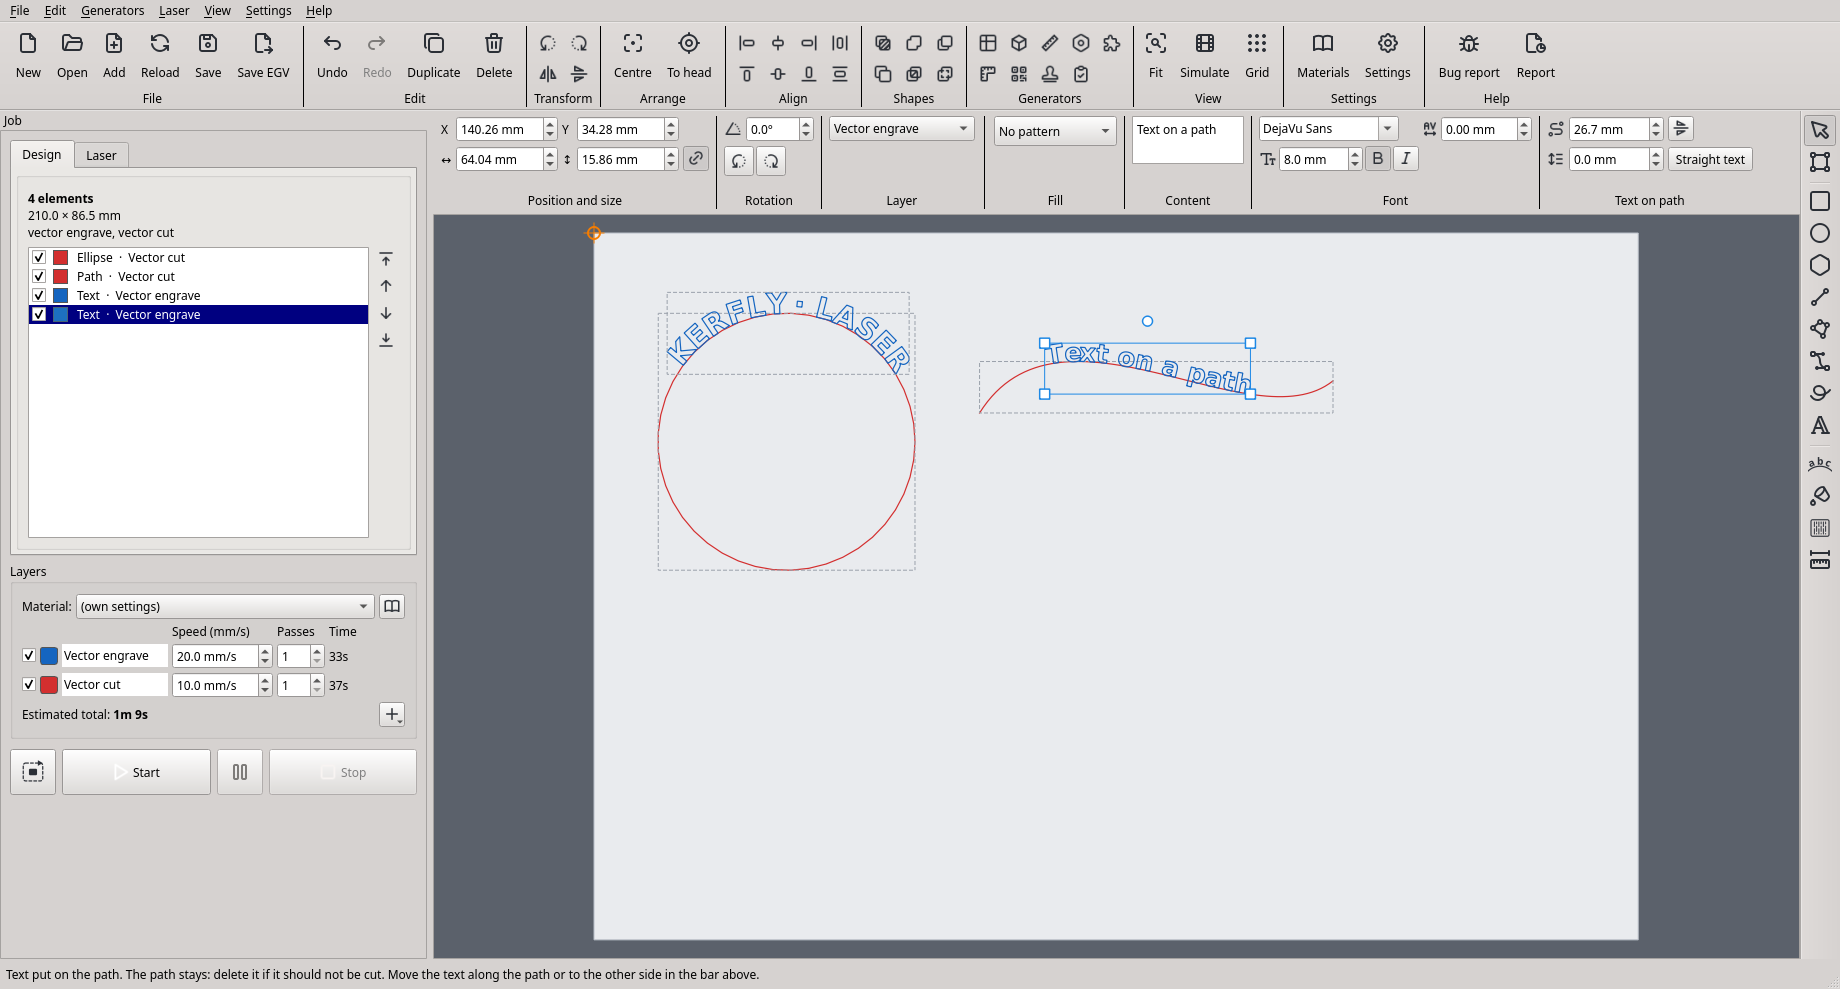
Text on a path. Choose the Text on a path tool (Shift+T, the arc with letters on the right), type the text and choose its font in the options bar, then click a line, curve or shape: the text is put on it, every letter standing on the line and turned along it. On an open line the text is centred, on a closed shape it is centred at the top. If a text is selected when you click, that text is moved onto the shape (for example one written with the Text tool), so no copy stays behind. Drag the text to slide it along the line; on a circle it goes round. The Text on path section of the options bar has the position along the path (route icon), the distance from the line (line-height icon; below zero the letters cross the line), the other side button and Straight text; the letter spacing field (AV icon) of the Font section adds space between the letters, also for ordinary text. Hold the mouse over a field to see what it does. The shape stays; delete it if it should not be cut. An existing text is put on a shape with Edit → Put text on path (select both). The arrow keys and the X/Y fields move the text together with its path.
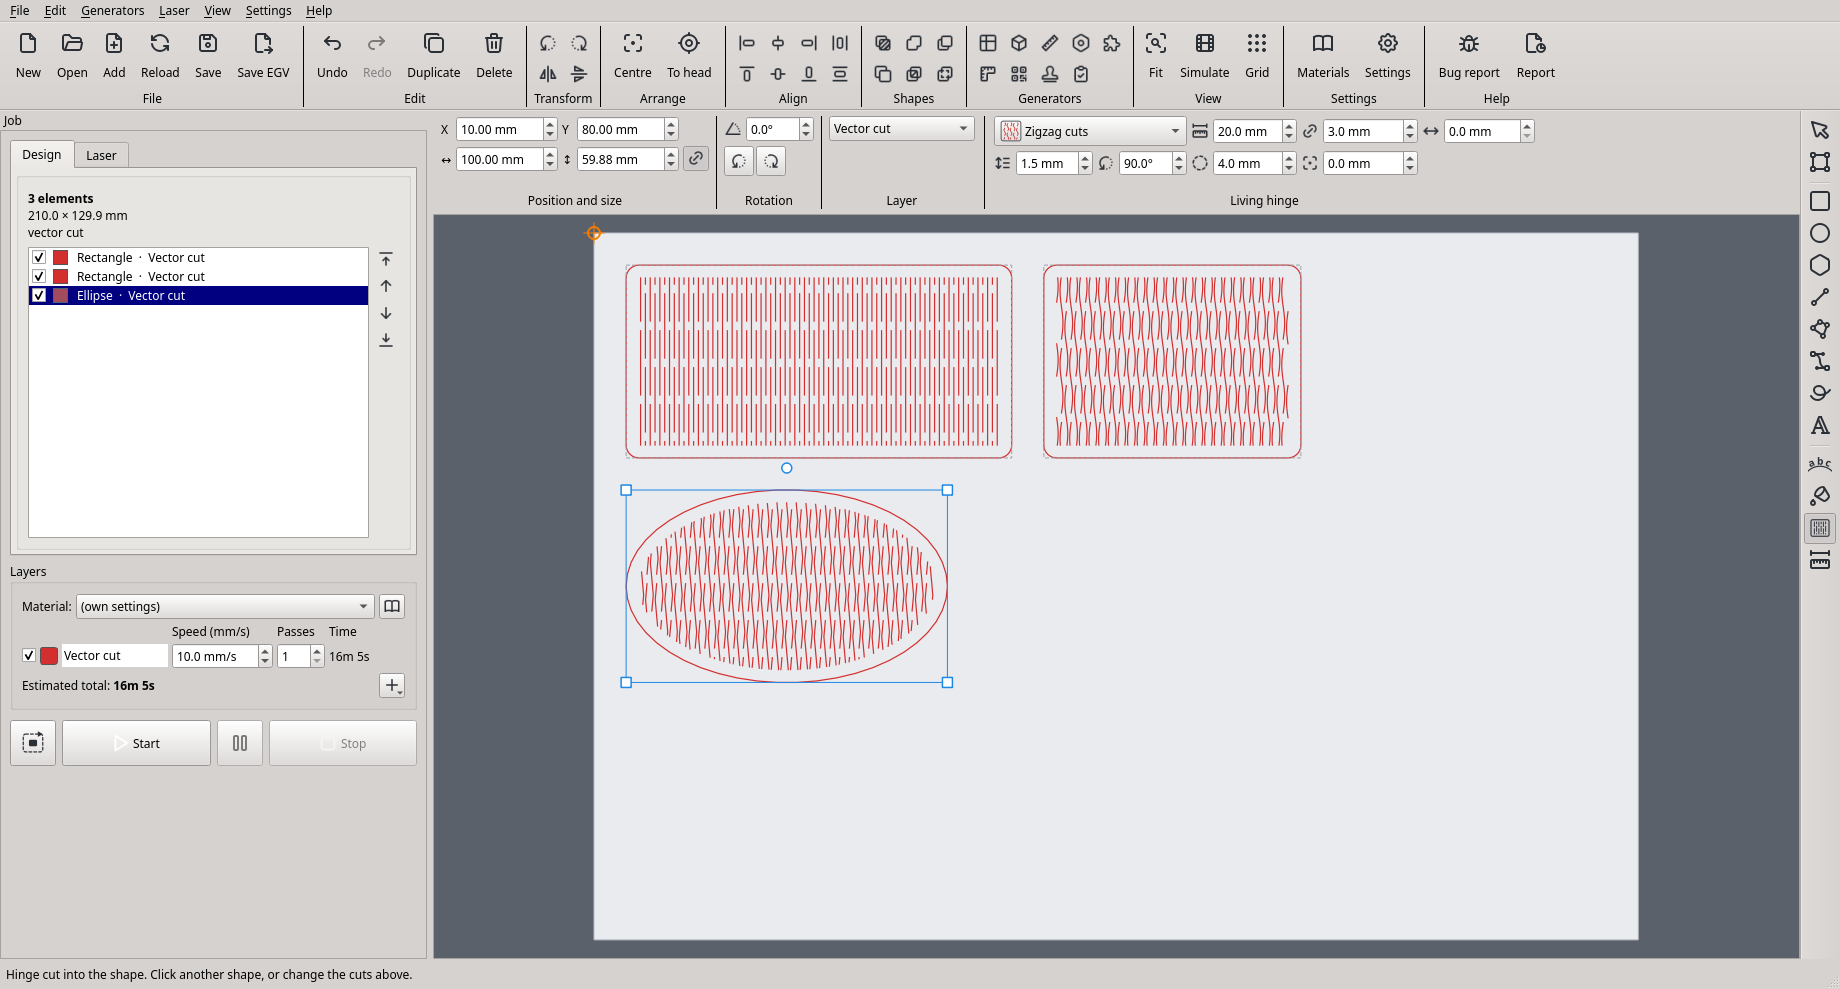
Living hinges. A living hinge is a field of cuts that lets a sheet of plywood or MDF bend, for example round the corners of a box. Choose the Living hinge tool (Shift+H, the sheet with cuts), choose the cuts in the options bar (straight, wavy or zigzag), then click a closed shape: the cuts are cut inside it, before its outline. The fields of the Living hinge section, each with an icon and a tooltip, set the length of one cut, the bridge of uncut material between two cuts, the distance between the rows (smaller bends more), the direction of the cuts (90°: up and down, the sheet bends across them), the solid border kept along the outline, and the band: its width (0: the whole shape) and where its middle is, measured from the middle of the shape (minus: left / up, plus: right / down), for a hinge only where the sheet bends. Selected shapes get the hinge you choose at once; a shape with a hinge shows the section with the select tool too, where No hinge removes it. Try a small piece first: how far the sheet bends depends on the material.
Bridges (tabs). A closed shape on a cut layer can keep small uncut bridges that hold the part in the sheet: set their number and width in the Bridges section.
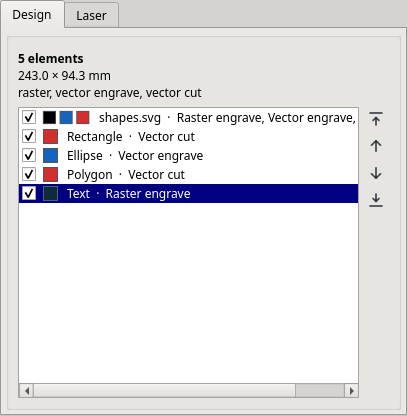
Element list. The Design tab lists all elements with the colours of their layers. Click a row to select it on the bed (Ctrl / Shift: several); untick it to leave it out of the job.
Generators. The Generators group of the toolbar (and the Generators menu) makes ready designs from a few numbers. Each one opens a window with its settings and a preview; Enter in a field updates the preview, Insert puts the design on the bed at the laser head as one group (drag it into place; one Undo takes it away). The last numbers are remembered.
- Material test: a grid of fields, each with its own speed (columns) and power or number of passes (rows), each field on a layer of its own, the values engraved beside them. Cut or engrave it, then pick the best field. Power changes only on M3 boards; on other boards the rows change the passes.
- Finger-joint box: bottom, four walls and a lid (or an open box) that fit together with fingers; outside or inside sizes, material thickness, finger width and the kerf (the parts grow by half of it so the fingers fit tightly).
- Kerf test: a comb cut into pieces (push them together and measure: kerf = (length − measured) / pieces) and a plate with slots of the material’s thickness plus a clearance each, to find the tightest fit.
- Gear: a spur gear with involute teeth (teeth, module, pressure angle) and a hole for the axle.
- Puzzle: a jigsaw puzzle cut of any size and number of pieces; Variant turns the tabs other ways.
- Ruler: a mark every millimetre, numbers every centimetre.
- QR code: a text or web address as a code to engrave (raster).
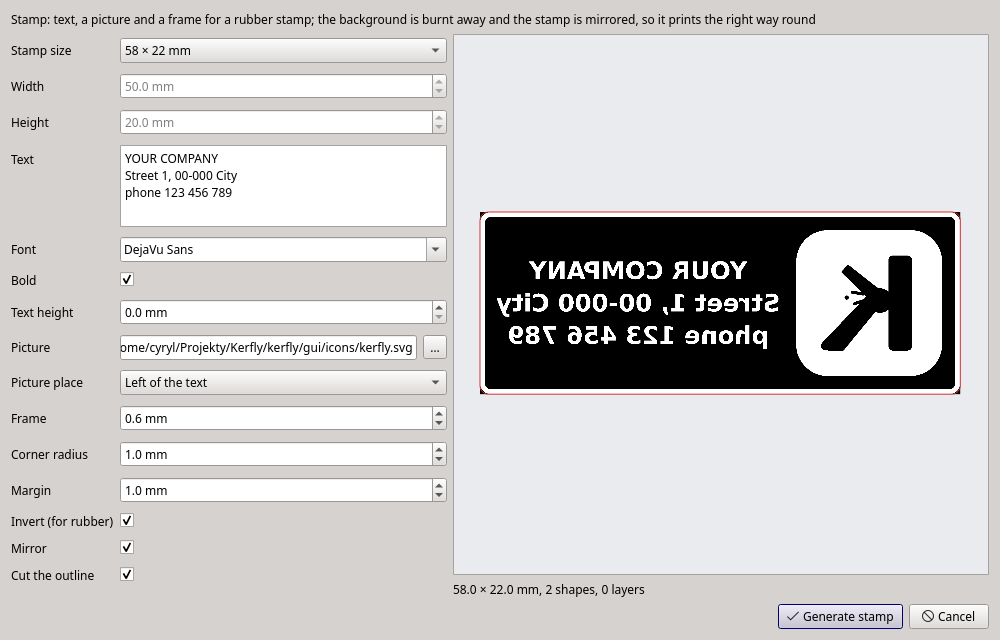
- Stamp: a rubber stamp. Choose the size (usual self-inking sizes or your own), type the lines, choose the font, a picture (logo) and a frame, then Generate stamp: the colours are inverted (the background is burnt away, the text stays raised) and the stamp is mirrored, so it prints the right way round. A cut line around it cuts the stamp out of the rubber.
- Test card: every operation on a piece of 3 mm plywood (a 50 mm square with a 20 mm hole, a 100 mm ruler, raster, patterns, a hinge, text on a path, bridges), to check the laser.
6. Layers and materials
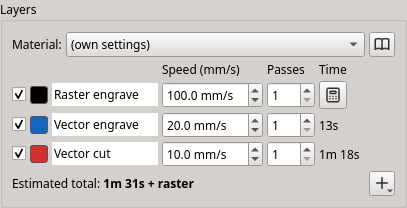
Every element has up to three parts: a raster engrave part (pictures and fills), a vector engrave (outline) part and a vector cut part. Each part goes to a layer. A layer has its own speed, number of passes, power (M3 boards with power control) and colour. Untick a layer to leave it out of the job.
- The layer decides what the laser does. Select a drawn shape and choose its layer in the Layer list of the options bar: a cut layer cuts it, an outline layer engraves its outline (and its pattern fill), a raster layer fills it.
- More layers. The + button under the layers adds another cut, outline or raster layer, for example a second cut layer with another speed. Layers run in the order raster, outline, cut.
- Time. The Time column shows how long each layer takes; for raster layers press the calculator button. View → Simulate job… (Ctrl+Shift+J) plays the head’s moves on the bed.
- Materials. Settings → Material library… stores speeds, passes and powers per material (for example “Plywood 3 mm”). Choosing a material in the Material list above the layers sets all layers at once. The library can be exported and imported to share it.
7. Running a job
- Connect and home the laser, put the material in and focus.
- Place the design on the bed (or let it follow the head, see section 3).
- Trace boundary (the dashed-outline button, Laser menu) drives the head around the design, with the laser off unless set in the settings, so you can check where it will be cut. It runs round the rectangle around the design, starting at the corner nearest the head (Settings → Vector: switch off “Boundary trace as a rectangle” to follow the outline instead).
- Start (F9) runs all ticked layers. Pause stops the laser for a moment and the same button resumes it. Stop (Esc) ends the job immediately; then press Home before the next job.
- The progress bar at the bottom shows the percentage of the current step (preparing the data, sending it to the laser).
Safety check. Before anything is sent, Kerfly checks that the head stays on the bed during the whole job and the trace. If it would leave the bed by more than 1 mm, nothing is sent and the status bar says which edge and by how much.
Test fire (M3 boards, Laser tab): fires the laser briefly with the power and time set next to the button.
EGV files. File → Save EGV file… writes the job to a file (not with M3 power per operation); File → Send EGV file to laser… sends an existing EGV file.
8. Settings
Settings → Settings… (Ctrl+,) has six tabs:
| Tab | Settings |
|---|---|
| Machine | controller board, units, bed size, home in the upper right corner, home when connecting, unlock the rail and beep after a job, X/Y scale factors, M3 power per operation and maximum power |
| Raster | halftone (dither) and its resolution, invert colours, mirror, rotate 90°, engrave bottom to top, scan line step, levels curve |
| Vector | cut inside shapes first, boundary trace with the laser on, as a rectangle or along the outline, trace gap and speed |
| View | snap grid size (0: off), snap to other objects, the design follows the laser head (these three are also remembered by themselves when changed in the View menu) |
| Rotary | rotary attachment, its scale factor and rapid speed |
| Advanced | language (after a restart), Inkscape, reduced memory use, USB data preparation, waiting for the laser, USB timeout and retries |
Kerfly is available in English, Polish, German, Spanish and French.
9. Keyboard shortcuts
| Keys | Action |
|---|---|
| Ctrl+N | New project |
| Ctrl+O / Ctrl+Shift+O | Open design / add design |
| F5 | Reload design |
| Ctrl+S / Ctrl+Shift+S | Save project / save project as |
| Ctrl+Shift+E | Save EGV file |
| Ctrl+Z / Ctrl+Shift+Z | Undo / redo |
| Ctrl+D / Del | Duplicate / delete |
| Ctrl+L / Ctrl+R | Rotate 90° left / right |
| Ctrl+Shift+H / Ctrl+Shift+V | Mirror horizontally / vertically |
| Ctrl+Shift+G / Ctrl+Alt+G | Group / ungroup |
| Ctrl+E | Centre on the bed |
| PgUp / PgDown | Move up (earlier) / down (later) in the element list (Ctrl: to the start / end) |
| Ctrl+H | Place design at the head |
| Ctrl+Alt+H | Design follows the head (on / off) |
| Arrow keys (Shift: ×10) | Move the selected element |
| Ctrl+arrow keys | Move the laser head by one step |
| Ctrl+7, 9, 5, 1, 3 | Head to the design’s upper left, upper right, centre, lower left, lower right |
| Ctrl+G | Go to the X/Y position |
| Ctrl+I | Connect to the laser |
| Home | Home the head |
| F9 / Esc | Start / stop |
| Ctrl+0 | Fit the bed to the window |
| Ctrl+Shift+J | Simulate the job |
| Ctrl+’ / Ctrl+; | Snap to grid / snap to objects |
| Alt (held) | Snap to nothing for a moment |
| Ctrl+, | Settings |
| F1 | This user guide |
| S, N, R, E, P, L, Shift+L, B, F, T, Shift+T, Shift+F, Shift+H, M | Tools (see section 5) |
10. When something goes wrong
Help → User guide (F1) opens this guide.
- Help → Report a problem on GitHub… (toolbar Bug report) saves a diagnostic report and opens the report form with your version, system and board filled in. Drag the report file into the form’s Diagnostic report field. You can write in English or Polish. A free GitHub account is needed.
- Help → Save diagnostic report… (toolbar Report) only saves the report: settings, self-test and the log of everything sent to the laser.
- Help → Open the log folder shows
kerfly.log.
Common problems:
| Problem | What to do |
|---|---|
| “Laser is not initialized” | Press the plug button (Ctrl+I). On Linux choose Laser → Allow USB access for the laser…; on Windows check the libusb driver |
| The head is not where the program shows it | Press Home. This happens after Unlock rail, after moving the head by hand and after Stop |
| An element is drawn red, Start does not work | The element sticks out of the bed: move it back |
| SVG text is missing or not cut | Install Inkscape: it turns SVG text into paths |
| The laser stops responding | Laser → Unfreeze laser, then Release USB and connect again |